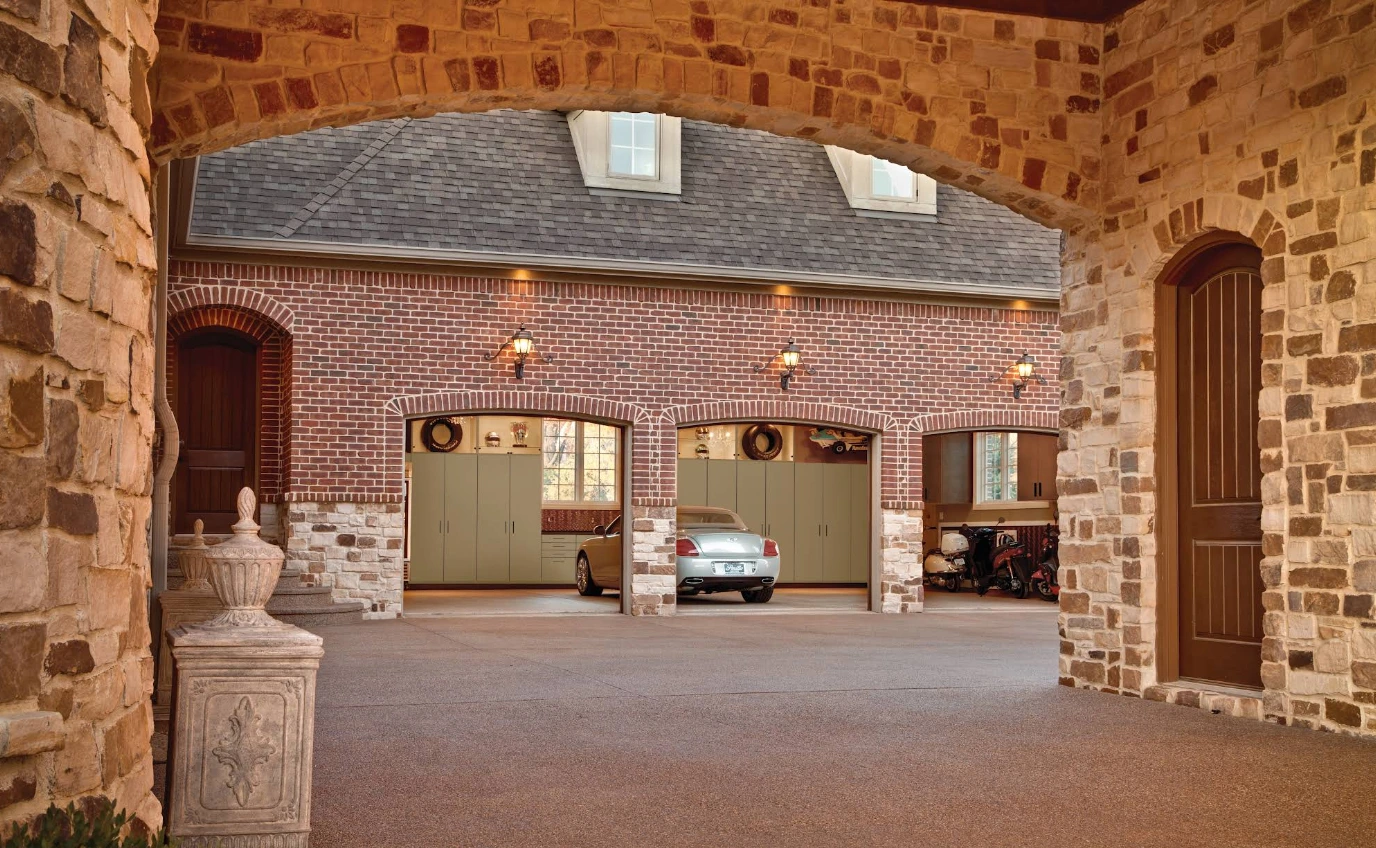
When it comes to transforming your garage into a polished, professional space, the walls, trim, and ceiling are often the finishing touches that make the biggest impact. Many homeowners in Silver Spring overlook these elements, focusing primarily on flooring or storage solutions. However, quality wall, trim, and ceiling finishes can dramatically elevate your garage's appearance, protect your investment, and create a space you're proud to show off. At Garage Design Source, we understand that a truly exceptional garage requires attention to every detail, from the foundation to the final coat of paint.
Wall, Trim & Ceiling Finishes in Silver Spring, MD
When it comes to transforming your garage into a polished, professional space, the walls, trim, and ceiling are often the finishing touches that make the biggest impact. Many homeowners in Silver Spring overlook these elements, focusing primarily on flooring or storage solutions. However, quality wall, trim, and ceiling finishes can dramatically elevate your garage's appearance, protect your investment, and create a space you're proud to show off. At Garage Design Source, we understand that a truly exceptional garage requires attention to every detail, from the foundation to the final coat of paint.
Whether you're looking to refresh a tired garage, prepare walls for storage system installation, or create a cohesive, finished look throughout your space, professional wall, trim, and ceiling finishing services ensure your garage looks as good as it functions. This comprehensive guide explores what goes into quality finishing work, common issues homeowners face, and how to approach this important aspect of your garage transformation in the Silver Spring area.
Why Wall, Trim & Ceiling Finishes Matter in Your Garage
Your garage walls serve multiple purposes beyond just supporting the structure. They protect your garage from moisture and temperature fluctuations while creating the visual backdrop for everything else in the space. In Silver Spring, where humidity levels can fluctuate significantly throughout the year, properly finished walls and ceilings help prevent moisture damage, mold growth, and deterioration over time.
Many homeowners don't realize that unfinished or poorly finished garage walls and ceilings can actually detract from other investments you've made. If you've installed premium garage flooring or invested in a high-end storage system, shabby walls and a dingy ceiling undermine that investment. Conversely, professional finishing work ties everything together, creating a cohesive, polished appearance that makes your entire garage feel more refined and intentional.
Quality finishes also serve practical purposes. Properly primed and painted walls are easier to clean and maintain. They resist dust accumulation and staining better than bare drywall or concrete. Finished ceilings prevent dust and debris from falling into your workspace, and quality trim installation provides clean lines that enhance the overall aesthetic while protecting wall edges from damage.
Common Wall, Trim & Ceiling Issues in Silver Spring Garages
Understanding the challenges specific to your region helps you make informed decisions about finishing work. Silver Spring's climate and the age of many homes in the area create particular issues that affect garage interiors.
Moisture and Humidity Damage
Silver Spring experiences significant humidity, especially during spring and summer months. Unfinished or improperly sealed garage walls absorb this moisture, leading to drywall deterioration, paint failure, and the ideal environment for mold and mildew growth. Many homeowners notice paint peeling or bubbling within a year or two of initial painting if the underlying moisture issue hasn't been addressed.
Drywall Damage and Settling Issues
Older homes in the Silver Spring area often experience foundation settling, which can cause drywall cracks and stress fractures. These aren't just cosmetic issues - they can indicate movement or moisture problems that need to be addressed during any finishing project. Many homeowners attempt quick patches without addressing the underlying cause, only to see the damage reappear months later.
Improper Surface Preparation
One of the most common reasons finishing work fails is inadequate surface preparation. Bare drywall that hasn't been properly primed absorbs paint unevenly, leading to blotchy finishes and premature failure. Existing paint that's been applied over dirty or glossy surfaces won't adhere properly, resulting in peeling and bubbling.
Outdated or Damaged Trim
Many older garages in Silver Spring feature trim that's damaged, warped, or simply doesn't match modern aesthetics. Replacing or refinishing trim can seem daunting, but it makes an enormous visual difference in how polished and intentional your garage looks.
Ceiling Neglect
Garage ceilings are often overlooked, yet they're one of the first things people notice when they enter the space. Unfinished ceilings collect dust, cobwebs, and accumulated grime. Finished ceilings not only look cleaner but are actually easier to maintain and can improve lighting by providing a reflective surface.
Surface Preparation - The Foundation of Quality Finishing
Proper surface preparation isn't glamorous, but it's absolutely essential for finishing work that lasts. At Garage Design Source, we invest significant time in preparation because we know it's the difference between a finish that looks great for six months versus six years.
Wall Inspection and Assessment
The first step is a thorough inspection of existing walls to identify moisture issues, structural cracks, or areas of deterioration. In Silver Spring garages, we're particularly attentive to signs of moisture damage or mold. Any existing moisture problems must be addressed before finishing work begins, or the new finish will fail prematurely.
Cleaning and Degreasing
Garage walls accumulate oils, dust, and residue from vehicle use and storage. These contaminants prevent paint and primer from adhering properly. Thorough cleaning with appropriate degreasers is essential, followed by rinsing and complete drying.
Repairing Holes and Imperfections
Small nail holes and minor damage can be patched with spackling compound. Larger holes require drywall patches, and stress cracks need to be assessed for underlying causes. In homes with settling issues, we may recommend using flexible caulk in areas prone to recurring cracks rather than traditional drywall tape and mud, which can crack again if movement continues.
Sanding and Smoothing
All patched areas are sanded smooth to blend seamlessly with surrounding surfaces. Existing paint that's glossy or in poor condition may be sanded to improve adhesion for new primer and paint. This step ensures an even, professional finish.
Priming for Optimal Results
Priming is where many DIY efforts fall short. Quality primer creates a uniform base that allows paint to adhere properly and provides consistent color coverage. For garage applications, we recommend primers specifically formulated for challenging environments - primers that resist moisture and provide excellent adhesion to drywall and other surfaces.
Drywall Repair and Patching Solutions
Depending on the extent of damage or your desired finish, drywall repair and patching might involve simple cosmetic fixes or more substantial repairs. We handle both.
Small Holes and Damage
Nail holes and small punctures are filled with lightweight spackling compound, sanded smooth, and then covered with primer and paint. This approach works well for minor cosmetic damage.
Medium-Sized Damage
Holes ranging from 1-6 inches are patched using self-adhesive drywall patches or traditional drywall tape and joint compound. These patches are feathered and blended carefully to ensure they're invisible once primed and painted.
Larger Damage and Cracks
Significant damage or long stress cracks require cutting back to solid drywall, installing backing, and patching with new drywall material. Stress cracks in particular need careful assessment - recurring cracks often indicate structural movement that needs to be addressed separately.
Moisture-Damaged Drywall
If drywall has been exposed to moisture and shows signs of damage, affected sections should be replaced rather than simply patched. Moisture-damaged drywall compromises the structural integrity and won't provide a solid foundation for finishing work.
Primer and Paint Options for Garage Environments
Not all paints are created equal, and garage environments require specific considerations. Silver Spring's humidity and temperature fluctuations make paint selection particularly important.
Interior Garage Paint Types
Latex-Based Paints provide excellent adhesion, quick drying, and easy cleanup. They're lower in VOC (volatile organic compounds) and work well in garages where ventilation might be limited. Modern latex paints offer excellent durability and are our standard recommendation for most garage applications.
Oil-Based Paints provide superior durability and excellent adhesion, particularly over glossy surfaces. However, they require more careful application, longer drying times, and more stringent ventilation during application. They're ideal when maximum durability is required.
Specialty Garage Paints formulated specifically for garage environments offer enhanced moisture resistance and durability. These paints often include mildew inhibitors and are designed to withstand the unique challenges garages face.
Color and Finish Considerations
Paint finish significantly impacts both appearance and maintenance requirements. Flat finishes offer a sophisticated look but are harder to clean. Eggshell and satin finishes provide a subtle sheen that's easier to maintain while still looking refined. Semi-gloss finishes are highly washable and durable, making them practical for garage applications where cleaning and durability matter.
Regarding color, light and neutral tones brighten garage spaces and make them feel larger and more professional. White and off-white are popular choices that complement any garage aesthetic. However, gray, beige, and soft blue tones are increasingly popular, offering a modern look while hiding dust and imperfections better than pure white.
Primer Selection
Choosing the right primer is as important as choosing the right paint. For garage applications in Silver Spring, we recommend:
- Bonding primers for challenging surfaces like glossy existing paint or slick concrete
- Moisture-resistant primers for areas prone to humidity fluctuations
- Stain-blocking primers if covering existing stains, water damage, or darker colors
- Mold and mildew-resistant primers as an added layer of protection in humid environments
Trim and Molding Installation and Restoration
Trim plays an important role in both aesthetics and functionality. Quality trim installation creates clean lines, hides imperfections at wall-to-ceiling and wall-to-floor transitions, and elevates the overall appearance of your garage.
Types of Trim and Molding
Base Trim runs along the bottom of walls where the wall meets the floor. Standard base trim is typically 3-5 inches tall. Base trim protects the lower wall from kicks, impacts, and moisture while creating a finished look.
Crown Molding installed where walls meet the ceiling creates architectural interest and makes the space feel more intentional and polished. Crown molding is optional but dramatically improves the overall aesthetic.
Cove Molding provides a curved transition between walls and ceilings, creating a softer, more refined appearance than sharp corners.
Picture Rail installed around the upper portion of walls can add architectural detail and provide a visual break between wall and ceiling.
Material Choices
Trim materials must withstand garage environments. MDF (medium-density fiberboard) offers an economical option with clean lines and excellent paint finish. Solid wood provides premium appearance and durability, with choices ranging from pine to hardwoods. Foam molding offers lightweight installation with the appearance of traditional trim, ideal for complex profiles.
Installation Process
Proper trim installation begins with careful measurement and planning. Trim pieces must be precisely cut and fitted at corners, transitions, and against fixtures. We use quality adhesive and fasteners to ensure trim stays secure as the house experiences normal settling and temperature fluctuations.
Once installed, all trim is caulked at joints and where it meets walls or ceilings. High-quality paintable caulk creates seamless transitions that look professional and are easy to maintain. Trim is then primed and painted to match your wall finish, creating a cohesive, polished appearance.
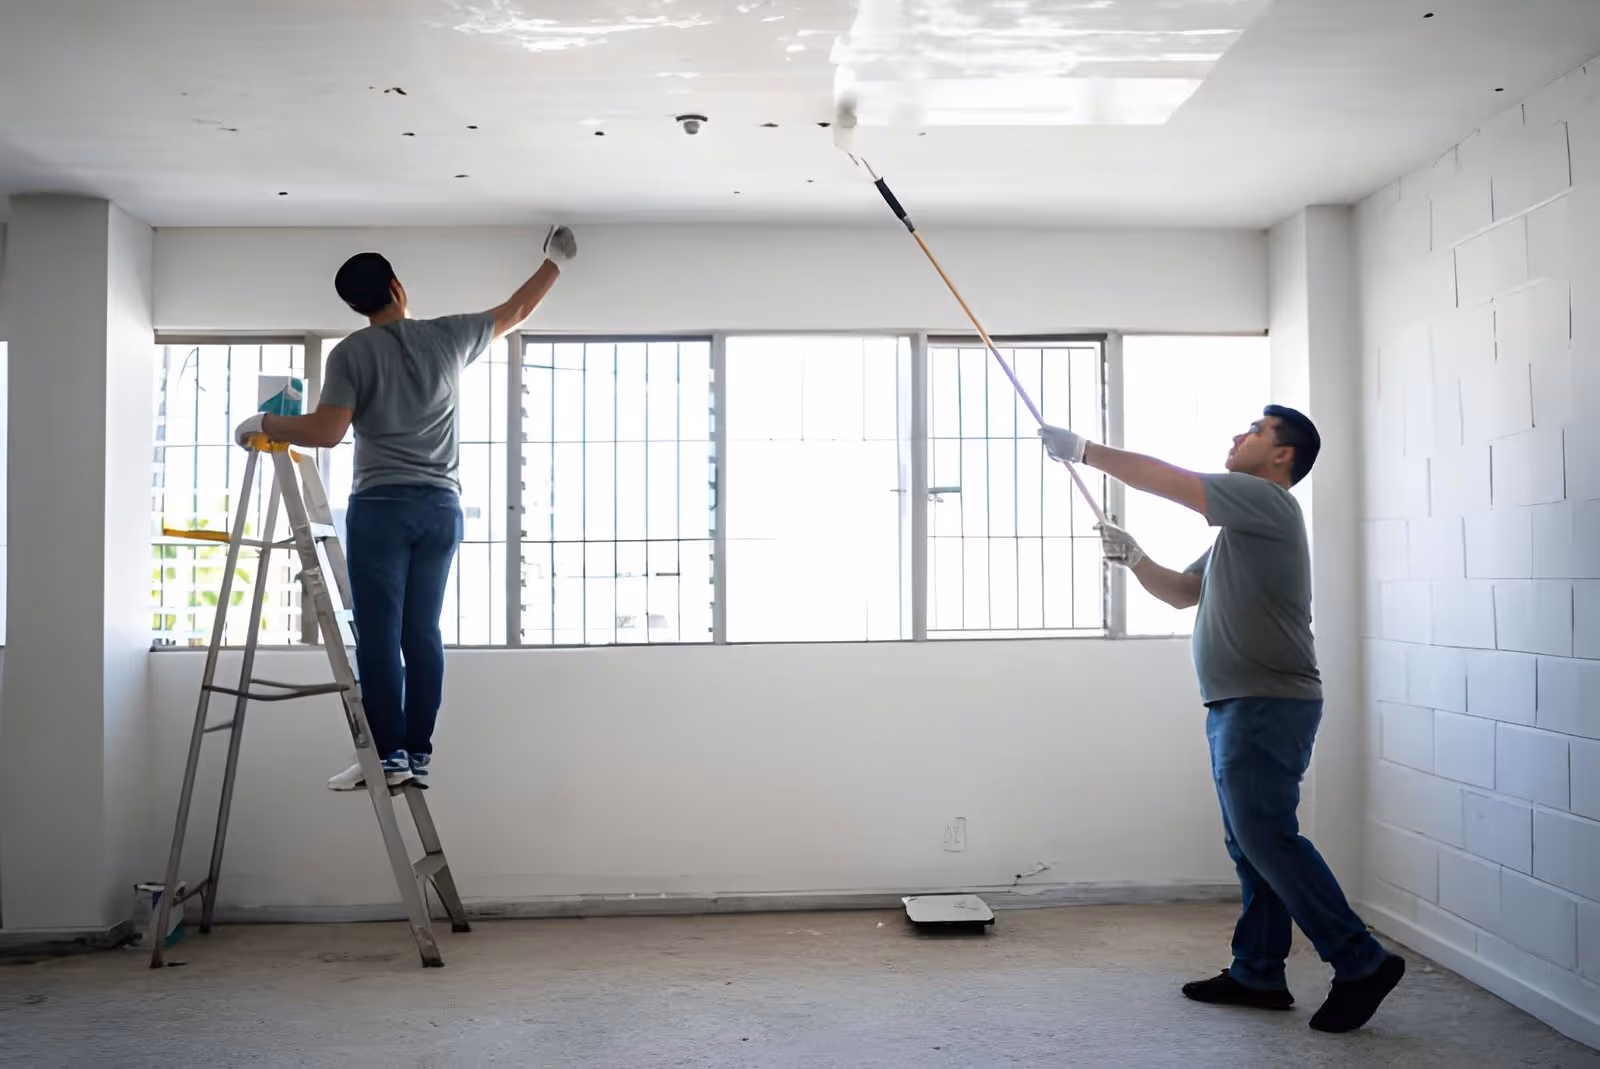
Ceiling Finishing Techniques
Garage ceilings are perhaps the most-overlooked element in the garage, yet they have tremendous impact on the overall appearance and functionality of the space.
Drywall Ceilings
Finished drywall ceilings provide a clean, polished look that's easy to maintain. Installation involves securing drywall sheets to ceiling joists with appropriate fasteners, taping and mudding all joints, sanding smooth, then priming and painting. The result is a smooth, clean surface that's far superior to exposed joists and ductwork.
Drop Ceiling Tiles
Suspended ceiling tiles offer an economical alternative to drywall. They're easy to install, provide good acoustic properties, and allow access to wiring and ductwork above. Modern ceiling tiles come in various styles and finishes, from plain white to textured surfaces that disguise imperfections.
Exposed Beam Finishes
Some homeowners prefer the look of exposed ceiling joists and ductwork. While less common in residential garages, this look can be sophisticated when done intentionally. Exposed beams and infrastructure should be painted to look deliberate rather than unfinished. Quality paint that matches or complements your wall color creates a cohesive, intentional appearance.
Popcorn Ceiling Removal and Refinishing
Many older homes in Silver Spring feature textured popcorn ceilings. If you're planning ceiling work, removing these and refinishing with smooth drywall or ceiling tiles is an excellent way to modernize the space.
Moisture Barriers and Ventilation Considerations
In humid climates like Silver Spring, proper ventilation prevents moisture accumulation in attic spaces above garages. Ensuring adequate ventilation during ceiling finishing work is essential for long-term durability. Our ceiling finishing approach accounts for your home's ventilation system and incorporates proper moisture management.
Color and Material Consultation
Choosing the right colors and materials can feel overwhelming. The options are endless, and decisions in these areas significantly impact both aesthetics and functionality.
Color Selection Process
We guide clients through color selection by considering factors including:
- Lighting conditions - Your garage's natural light and artificial lighting dramatically affect how colors appear
- Size perception - Light colors make spaces feel larger; darker colors create coziness or drama
- Maintenance - Light colors show dust and marks more readily; mid-tones provide a practical balance
- Cohesion - Your garage should complement your home's exterior and interior color schemes
- Personal preference - Ultimately, you should love the colors you choose
Material Selection
Material selection involves balancing aesthetics, durability, maintenance requirements, and budget. Premium materials like solid wood trim command higher investment but offer superior appearance and longevity. More economical materials like MDF or vinyl still provide excellent results when properly finished and maintained.
Consultation and Planning
Before any work begins, we spend time with you discussing your vision, showing examples of similar projects, and discussing how different choices will look in your specific space. We provide samples whenever possible so you can see finishes in your actual lighting and space rather than making decisions based on small swatches in a showroom.
Project Timeline and Process
Understanding what to expect during a wall, trim, and ceiling finishing project helps you plan accordingly and set realistic expectations.
Assessment and Planning Phase
Initial assessment identifies the scope of work, surface conditions, and any underlying issues that need addressing. We discuss your vision, review options, and provide a detailed project plan and timeline.
Surface Preparation - 2 to 5 days
Depending on the project scope, surface preparation typically takes several days. This phase includes cleaning, repairing damage, patching holes, priming, and preparing surfaces for finishing work. This is the most time-intensive phase but absolutely essential for quality results.
Drywall and Patching - 1 to 3 days
If significant drywall repair or patching is needed, this phase involves multiple coats of joint compound, sanding between coats, and final priming. Complex repairs may require several days for proper drying and finishing.
Primer Application - 1 day
Once surfaces are prepared and repaired, primer is applied to all surfaces. Primer provides the foundation for final paint application and ensures uniform color coverage and adhesion.
Paint Application - 2 to 3 days
Final paint application typically involves two coats to ensure uniform color and coverage. Drying time between coats must be respected, and adequate ventilation is maintained throughout.
Trim Installation - 1 to 5 days
Depending on the amount of trim and complexity of installation, trim work may take several days. Installation includes cutting, fitting, securing, caulking, priming, and painting.
Ceiling Finishing - 2 to 7 days
Ceiling finishing timelines vary dramatically depending on whether you're installing drywall, drop tiles, or refinishing existing ceilings. Complex ceilings with repairs or full drywall installation take longer than simple paint refreshes.
Total Project Timeline
A comprehensive wall, trim, and ceiling finishing project typically takes 2-3 weeks from start to finish, including proper drying time between coats and phases. Smaller projects focusing on walls and paint might take 1-2 weeks. Larger projects involving extensive drywall repair, custom trim, and complete ceiling installation may take 3-4 weeks.
Weather and humidity conditions in Silver Spring can impact drying times, so we build flexibility into timelines to ensure quality results.
Quality Assurance and Warranty Information
At Garage Design Source, we stand behind our work. Quality assurance begins during the project with careful attention to detail at every phase. We inspect surfaces before moving to the next phase, ensuring that substandard work isn't covered up by subsequent layers.
Quality Standards
Our finishing work meets or exceeds industry standards for residential interior painting and trim installation. This includes:
- Proper surface preparation with no shortcuts
- Quality primers and paints applied to manufacturer specifications
- Smooth, even coverage with no visible brush marks, roller marks, or paint drips
- Precise trim installation with proper joints, caulking, and finishing
- Clean edges and transitions throughout the project
- Professional appearance upon completion
Workmanship Warranty
We warrant our workmanship for one year from completion. This means if finish coats peel, crack, or fail due to improper application, we'll make corrections at no charge. Our warranty covers painting, trim installation, drywall finishing, and all other work performed.
Material Performance
We use quality primers and paints designed to perform in garage environments. Paint and primer manufacturers typically warrant their products against failure when applied according to specifications. We ensure all materials are applied correctly to maintain manufacturer warranties.
Protection of Your Investment
We take steps to protect your investment throughout the project and upon completion. Drop cloths and protective coverings protect your flooring, storage systems, and other garage features during work. Upon completion, we remove all debris and leave your space clean and ready to use.
Before and After Transformations
Wall, trim, and ceiling finishing work can completely transform how your garage looks and feels. These finishing touches take a functional space and make it a space you're proud to spend time in.
Typical transformations we see in Silver Spring garages include:
- Dated, worn walls with visible damage transformed into clean, bright, professional-looking spaces with fresh paint and quality trim
- Dark, dingy ceilings replaced with finished drywall or updated drop tiles, dramatically improving light reflection and overall brightness
- Gaps and imperfections hidden with quality trim installation and caulking, creating seamless transitions and clean lines
- Spaces that felt unfinished and chaotic transformed into polished, intentional rooms where organization and storage systems truly shine
Whether you're preparing for a complete garage overhaul or simply refreshing tired walls and ceilings, professional finishing work elevates your entire space.
Making Your Decision
Choosing to invest in professional wall, trim, and ceiling finishing is an investment in your home's value, appearance, and functionality. As a locally owned and operated company specializing in garage solutions, Garage Design Source brings years of experience to every project. We understand the specific challenges Silver Spring homeowners face, from humidity concerns to the architectural characteristics of homes in our area.
We approach each project with attention to detail and a commitment to quality that's reflected in work designed to last. Whether you're planning a comprehensive garage transformation or simply need to refresh walls and ceilings, professional finishing work ensures you get results that exceed expectations and perform reliably for years to come.