Your garage floor is more than just a surface - it's the foundation of your entire garage space. Whether you're dealing with unsightly cracks, spalling concrete, or uneven sections that make movement difficult, concrete damage can compromise both the appearance and functionality of your garage. At Garage Design Source, we understand that a damaged concrete floor detracts from the investment you've made in your home, especially if you've already upgraded your garage doors, storage systems, or other elements. Concrete repair and crack treatment isn't just about aesthetics - it's about protecting your floor from further deterioration and preparing it for the premium finishes that will transform your space.
Concrete Repair and Crack Treatment in Arlington, VA
Your garage floor is more than just a surface - it's the foundation of your entire garage space. Whether you're dealing with unsightly cracks, spalling concrete, or uneven sections that make movement difficult, concrete damage can compromise both the appearance and functionality of your garage. At Garage Design Source, we understand that a damaged concrete floor detracts from the investment you've made in your home, especially if you've already upgraded your garage doors, storage systems, or other elements. Concrete repair and crack treatment isn't just about aesthetics - it's about protecting your floor from further deterioration and preparing it for the premium finishes that will transform your space.
Arlington homeowners know that our region's climate, freeze-thaw cycles, and moisture exposure create unique challenges for concrete durability. Cracks that seem minor can expand rapidly over time, allowing water infiltration that weakens the base and creates a ripple effect of damage. That's why addressing concrete issues promptly - with the right assessment and treatment methods - is essential before applying protective coatings or storage systems.
Understanding Concrete Damage in Your Arlington Garage
Concrete doesn't fail all at once. It typically shows warning signs long before significant structural compromise occurs. Understanding what you're seeing on your garage floor is the first step toward choosing the right repair solution.
Common Types of Concrete Damage:
- Hair-line cracks - Thin surface cracks, often less than 1/8 inch wide, typically caused by shrinkage or minor settling
- Structural cracks - Wider cracks (1/4 inch or more) that indicate movement, load stress, or foundation shifting
- Spalling - Surface pitting or flaking where the concrete surface has broken away in chunks
- Crazing - A pattern of fine cracks across the surface, often from rapid drying or moisture penetration
- Alligatoring - Interconnected crack patterns that resemble alligator skin, usually from repeated freeze-thaw cycles
- Heaving or sunken sections - Uneven surfaces where portions of the floor have shifted or settled unevenly
Arlington's climate is particularly tough on concrete. Our winters bring freeze-thaw cycles that can aggravate existing cracks, and spring moisture from snowmelt and rain penetrates damaged areas, accelerating deterioration. If you've noticed cracks widening, new cracks appearing, or moisture seeping through to your basement or crawlspace, these are signs that your concrete needs professional attention.
Why Crack Assessment Matters
Not all cracks are created equal, and not all cracks require the same treatment. This is why Garage Design Source begins every concrete repair project with a thorough inspection and assessment. This step determines whether you're dealing with cosmetic damage or structural concerns that need immediate intervention.
During assessment, we evaluate:
- Crack width and depth - Measured precisely to determine which repair method is appropriate
- Crack pattern and direction - Structural cracks follow specific patterns that reveal underlying issues
- Moisture presence - Whether water is actively seeping through or has caused secondary damage
- Surface integrity - Whether the concrete around the crack is sound or compromised
- Cause analysis - Understanding whether cracks stem from settlement, freeze-thaw, load stress, or poor initial installation
This assessment phase is critical because it ensures we're not just treating symptoms - we're addressing the root cause. A crack that stems from foundation settling requires different handling than one caused by freeze-thaw expansion. Choosing the wrong repair method wastes time and money and often leads to repeated failure.
Surface Preparation and Cleaning
Once we've assessed your concrete, thorough preparation is the foundation of a successful repair. This step is often underestimated by property owners attempting DIY solutions, but it's absolutely essential for any treatment to adhere properly and last.
Surface preparation includes:
- High-pressure washing - Removes dirt, oil, dust, and debris that would prevent epoxy or polyurethane from bonding
- Degreasing - Uses appropriate cleaners to dissolve automotive fluids, tire residue, and other contaminants common in garage environments
- Crack cleaning - Removes loose concrete, dust, and foreign material from inside the crack using specialized equipment
- Surface profiling - Creates a texture that allows repair materials to grip securely
- Moisture assessment - Ensures the concrete has dried sufficiently (typically 48-72 hours after cleaning) for proper material application
- Repair site isolation - Protects surrounding areas from overspray or material contamination
This preparation phase is non-negotiable. If concrete isn't properly cleaned and prepared, even the highest-quality repair materials will fail. We've seen too many DIY attempts fail because homeowners tried to skip this step or rush through it. Proper preparation adds time to the project, but it's the difference between a repair that lasts years and one that fails within months.
Crack Routing and Injection Methods
After assessment and preparation, the actual repair work begins. For cracks, we typically employ routing and injection methods - proven techniques that stop crack progression and restore structural integrity.
Crack Routing Process:
Routing involves widening the crack slightly to create a channel that repair material can fill completely. This isn't about making the crack bigger - it's about ensuring that repair material reaches the full depth and width of the damaged area. A routed crack creates a larger surface area for the repair material to bond to, and it allows us to work with the crack profile rather than against it.
The routing process:
- Uses diamond-tipped tools to carefully widen the crack to a consistent width (typically 1/4 to 1/2 inch)
- Creates a squared or V-shaped profile that maximizes material bonding
- Goes the full depth of the crack to ensure complete filling
- Removes all dust and debris created during routing
- Allows proper drying before injection material is applied
Injection Methods:
Once the crack is routed and clean, we inject specialized repair materials. The method we choose depends on the crack characteristics and your goals for the space.
Epoxy injection works well for cracks in areas that don't require flexibility. Epoxy creates a rigid bond that essentially welds the concrete back together. It's exceptionally strong, waterproof, and resistant to chemicals. We use epoxy for structural cracks and areas where concrete-to-concrete bonding is the primary goal. Epoxy injection requires precise application and proper curing conditions - typically 24-48 hours before the area can be used.
Polyurethane injection is our choice for cracks where some flexibility is beneficial. Polyurethane expands slightly as it cures, which helps it fill micro-voids and ensures complete crack penetration. It's more forgiving of slightly damp conditions than epoxy, which is valuable in Arlington's moisture-prone environment. Polyurethane creates a waterproof seal and some flexibility for concrete movement.
The injection process involves:
- Applying injection ports or injection lines along the routed crack
- Using low-pressure or high-pressure injection equipment depending on crack depth
- Injecting material systematically to ensure the entire crack fills completely
- Monitoring injection pressure and flow to detect any voids or incomplete filling
- Removing injection equipment and sealing ports once complete
- Allowing proper cure time before the area is subjected to traffic or moisture
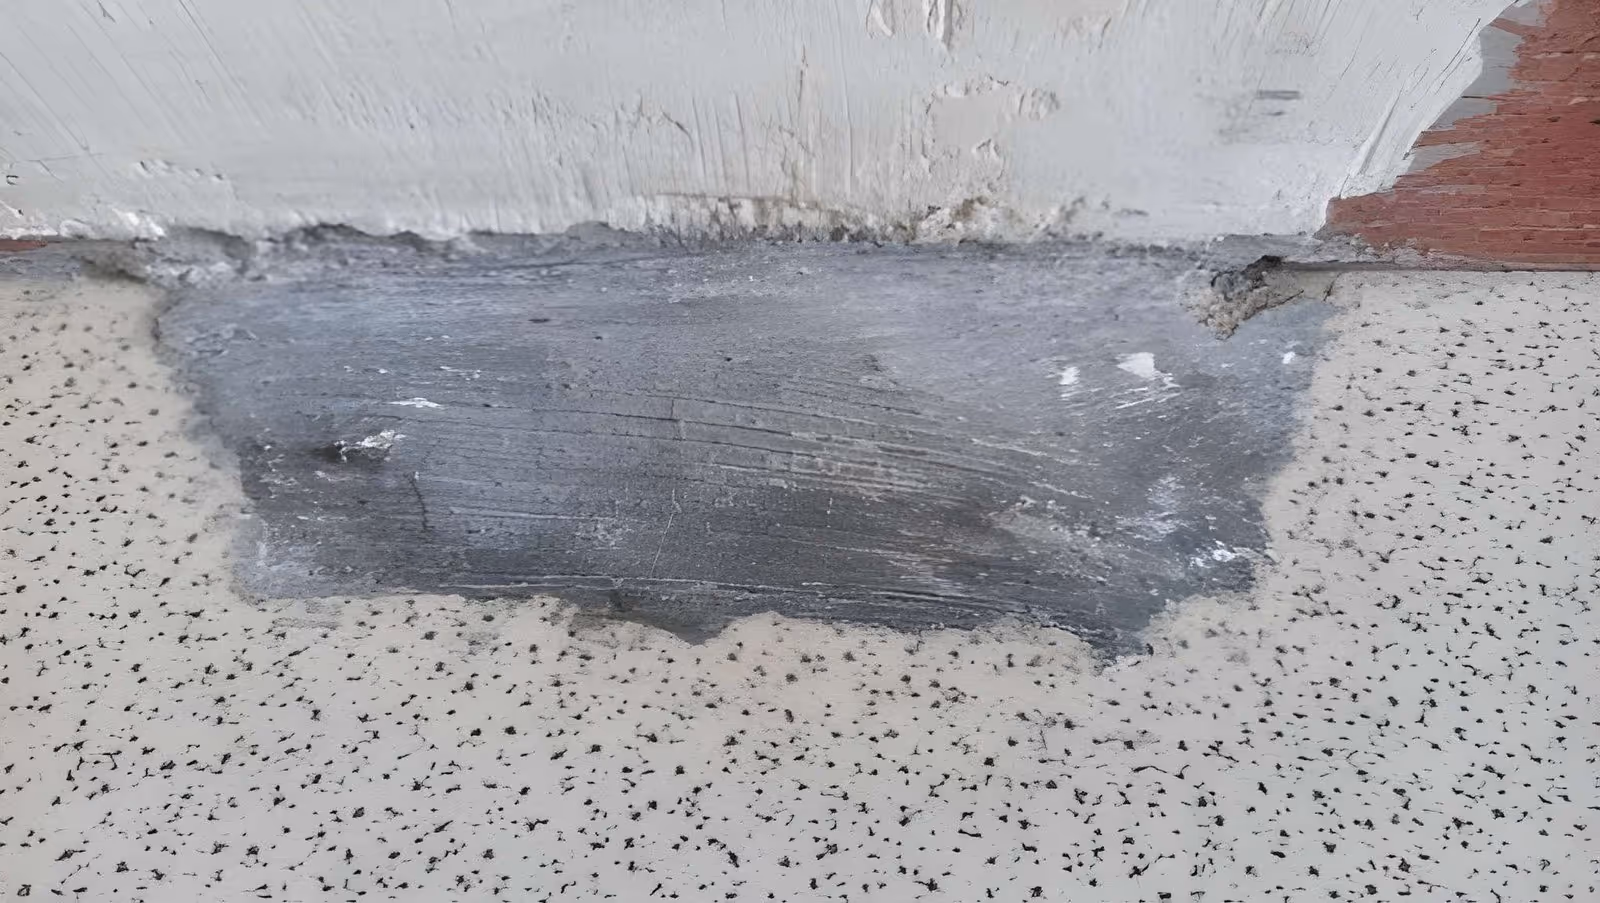
Patching and Leveling for Spalled Areas
Spalling - where concrete surface breaks away in chunks - requires a different approach than linear cracks. Spalled areas need to be excavated, filled, and feathered to create a smooth, even surface.
Spall Repair Process:
The process begins by removing all loose and damaged concrete from the spalled area. This creates a clean, solid edge around the damaged zone. We then assess the depth of the damage and the underlying concrete condition. If the spall is minor (surface only), we can typically fill it directly. If it's deeper, we may need to use a bonding agent to ensure proper adhesion between old and new concrete.
For shallow spalls, we use self-leveling epoxy or polyurethane patching compounds that flow into the damaged area and create a level surface. For deeper spalls, we may use a more substantial concrete patching compound that's troweled and feathered to match the surrounding floor level.
Leveling Process:
If your floor has sections that have settled or heaved, creating trip hazards or uneven areas, leveling restores a safe, level surface. Grinding removes high spots, while patching or self-leveling materials raise low spots. The goal is creating a smooth, even surface that's safe for walking and compatible with storage systems, workbenches, or future coatings.
For severe settling or heaving, we sometimes recommend concrete lifting (also called mudjacking), which involves injecting material under the concrete to raise settled sections back to level. This is particularly effective in Arlington where soil settling and foundation movement are common issues.
Recommended Protective Coatings
Once cracks are repaired and the concrete is sound and level, we recommend protective coatings. This step prevents future damage and dramatically improves appearance and durability.
Epoxy Coatings provide an exceptionally hard, glossy finish that's resistant to staining, chemicals, and wear. Epoxy is ideal if you're looking for maximum durability and an attractive, finished appearance. It's harder than polyaspartic but takes longer to cure (typically 5-7 days before full cure). Two-part epoxy creates a plastic-like finish that's very easy to clean.
Polyaspartic Coatings cure much faster than epoxy (typically 24-48 hours) while providing similar protection. If you need your garage back in use quickly, polyaspartic is an excellent choice. It's UV-stable, so it won't yellow over time like some epoxies. Polyaspartic handles moisture and humidity well, which matters in Arlington's climate.
Polyurea Coatings are extremely flexible and impact-resistant, making them ideal for garages where equipment is moved frequently or where vehicles are parked. Polyurea is the toughest option and cures fastest (sometimes same-day), but it's typically the most expensive choice.
Applying a protective coating after repair serves multiple purposes: it seals the repaired areas, prevents moisture penetration that could undermine repairs, makes cleaning easier, enhances appearance, and protects the underlying concrete from future damage. In Arlington's climate, where freeze-thaw cycles and moisture are ongoing concerns, a protective coating is the best insurance against repeat problems.
Project Timelines and Cure Times
Understanding the timeline for your concrete repair project helps you plan around access to your garage and avoid disrupting your routines.
Assessment and Planning: 1-3 days after initial contact
We schedule a consultation, conduct the thorough assessment we've described, discuss findings with you, and develop a detailed repair plan. This phase typically takes 1-3 days from initial contact to approval.
Surface Preparation: 1 day
High-pressure washing, degreasing, and crack cleaning typically occur in a single day. After preparation, the concrete needs to dry thoroughly - typically 48-72 hours - before repair materials are applied. During this drying period, you should keep the garage dry and avoid foot traffic on prepared areas.
Crack Repair (Routing and Injection): 1-2 days for application, plus cure time
The actual routing and injection process is relatively quick - typically 4-8 hours for residential garage-sized areas. However, the material then needs to cure. Epoxy typically requires 24-48 hours before the area can be subjected to foot traffic, and 5-7 days before it reaches full hardness. Polyurethane injection typically cures in 24 hours.
Spall Patching and Leveling: 1-2 days for application, plus cure time
Patching damaged areas typically takes 4-8 hours, depending on the number and size of spalls. Self-leveling materials set in 24 hours. Troweled patches may take 48-72 hours to fully cure. If grinding is involved, that can add a day to the timeline.
Coating Application: 1 day for application, 24 hours to 7 days for cure
Protective coating application typically takes 4-8 hours depending on garage size and coating type. Cure times vary significantly - polyaspartic may be ready for light traffic in 24 hours, while epoxy needs 5-7 days. We provide specific cure time guidance for whatever coating you choose.
Total Project Timeline: 1-2 weeks from assessment to completion
Most concrete repair projects in residential garages take 1-2 weeks from initial contact to completion, accounting for assessment, preparation, curing windows, and any protective coating application. We work with your schedule to minimize disruption.
Factors That Affect Repair Costs and Durability
While we don't discuss specific pricing on this page, understanding the factors that influence repair scope and costs helps you make informed decisions.
Crack Size and Extent directly affects material requirements and labor time. A single small crack requires less material and less routing work than extensive cracking across the floor. The cost scales with the total linear footage of cracks and their depth.
Floor Condition matters significantly. If your floor has multiple issues - cracks plus spalling plus settling - the repair scope expands. A floor with minimal damage is quicker and less expensive to address than one with multiple problem areas.
Cause Assessment sometimes reveals underlying issues that affect repair approach. If cracks stem from foundation settling, addressing only the cracks might not prevent future cracking if settling continues. Understanding the cause helps us recommend the most effective long-term solution.
Material Selection influences both cost and performance. Epoxy injection is different in cost than polyurethane injection. A basic concrete patch differs from a premium patching compound. Epoxy coatings, polyaspartic, and polyurea vary significantly in price and performance characteristics.
Accessibility and Site Conditions affect labor efficiency. A straightforward garage floor in good condition is faster and less expensive to repair than a complex project with obstacles or problematic moisture conditions.
Protective Coating Selection adds to the overall project cost. A basic topcoat differs from a premium garage floor coating system. We can discuss coating options based on your durability needs and appearance preferences.
Maintenance Tips for Long-Lasting Repairs
Once your concrete is repaired and protected, proper maintenance extends the life of the repair and keeps your garage looking great.
Regular Cleaning keeps protective coatings in good condition. Sweep regularly to remove grit that can scratch the surface. Wash with mild soap and water monthly to remove dust and light stains. For stubborn stains, use appropriate cleaners based on your coating type - we'll provide specific guidance.
Spill Management protects your repaired and coated concrete. Clean up automotive fluids promptly - don't let them sit on the surface. Epoxy and polyaspartic coatings are chemical-resistant, but extended exposure to certain fluids can cause damage. Regular spill cleanup is the best prevention.
Moisture Control is particularly important in Arlington. Keep your garage as dry as possible. Ensure gutters and downspouts direct water away from the foundation. If moisture seeps in, address the source rather than just the symptoms. We can recommend moisture management solutions if needed.
Avoid Excessive Deicing Chemicals if you park vehicles in your garage. Salt and harsh deicers tracked in on tires can damage protective coatings over time. Wash vehicles periodically to remove residue.
Monitor for New Cracks and address them promptly. If new cracks appear after repair, contact us immediately. Repetitive cracking in the same area might indicate an underlying structural issue that needs different treatment.
Recoating Maintenance keeps your protective coating in optimal condition. Epoxy and polyaspartic coatings wear over time with traffic and cleaning. Most floors benefit from maintenance recoating every 3-5 years depending on traffic level and maintenance practices. A maintenance coat rejuvenates the appearance and extends protection.
Why Choose Garage Design Source for Your Concrete Repair
Garage Design Source has been serving the Washington D.C. metro area since the early 2000s, specializing in comprehensive garage transformations. Our expertise spans flooring, storage, doors, and now concrete repair and crack treatment. We're locally owned and operated, which means we understand Arlington's specific climate challenges and soil conditions that affect concrete performance.
We don't approach concrete repair as a standalone service - we see it as one piece of your overall garage transformation. If your concrete needs repair, there's a good chance you're also thinking about your garage's overall appearance and functionality. We can coordinate concrete repair with other garage improvements, ensuring your entire space comes together cohesively.
Our assessment-first approach means we invest time in truly understanding your concrete's condition before recommending solutions. We don't just route and inject - we ask the right questions, identify root causes, and recommend solutions designed to prevent future problems rather than just addressing current symptoms.
We use quality materials and proven methods for concrete repair. Our team has extensive experience with epoxy and polyurethane injection, patching, leveling, and protective coating application. We follow industry best practices for assessment, preparation, application, and curing. Your concrete repair is done right the first time, which means it lasts.
Concrete repair and crack treatment is the foundation for everything else in your garage. Whether you're planning a complete garage transformation or simply protecting your investment, we have the expertise to assess your concrete, recommend appropriate solutions, and execute repairs that stand up to Arlington's climate and your family's use.