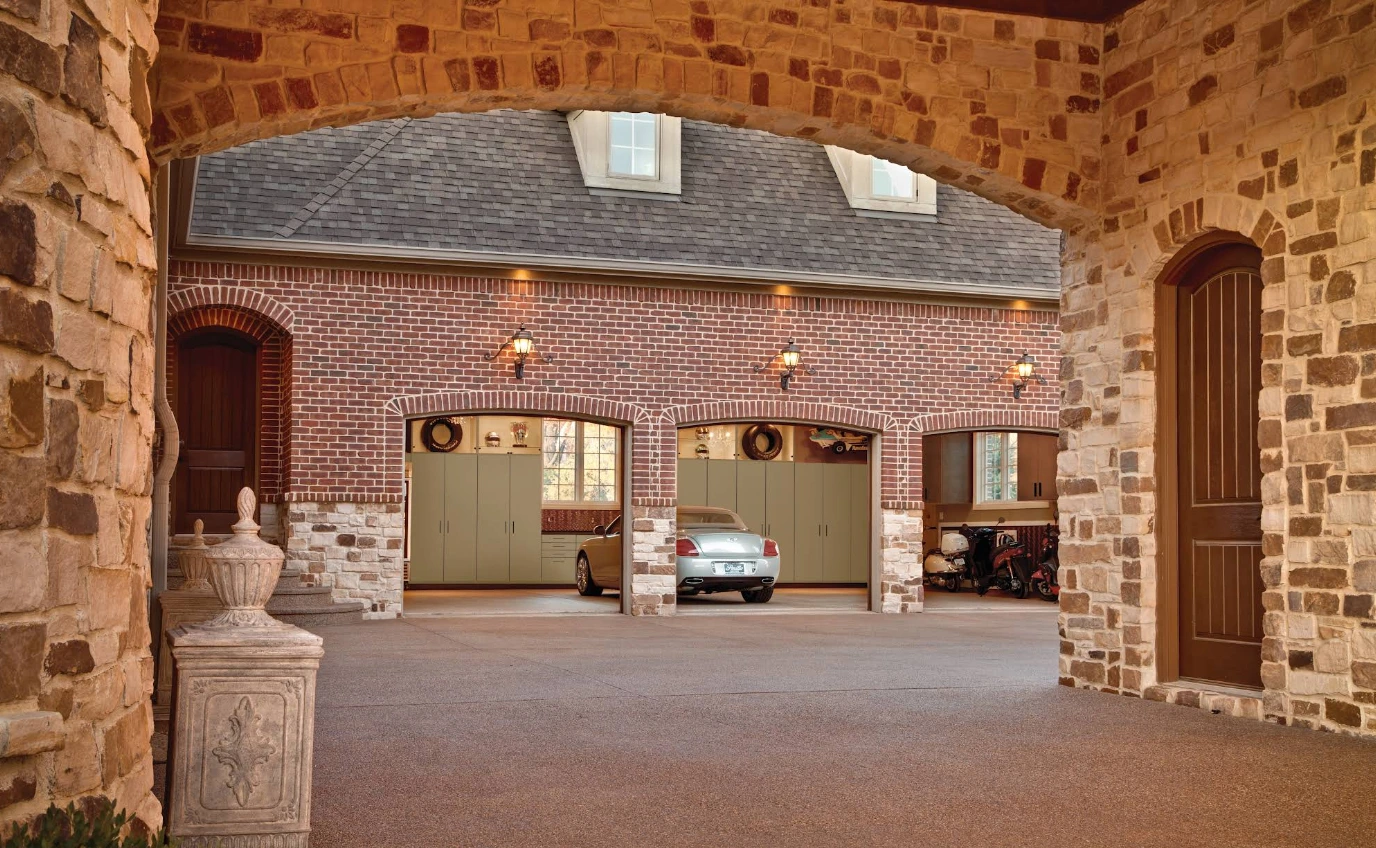
Your garage floor is one of the hardest working surfaces in your home. It supports the weight of vehicles, tools, storage systems, and years of daily activity - which is why cracks, spalling, and deterioration happen to nearly every concrete garage floor eventually. When damage appears, it's not just an aesthetic issue. Untreated cracks allow water infiltration, accelerate concrete breakdown, and can compromise the structural integrity of your floor. The good news is that with professional concrete repair and crack treatment in Leesburg, VA, your floor can be restored to a solid, clean foundation before applying protective coatings that will keep it beautiful for years to come.
Concrete Repair & Crack Treatment in Leesburg, VA
Your garage floor is one of the hardest working surfaces in your home. It supports the weight of vehicles, tools, storage systems, and years of daily activity - which is why cracks, spalling, and deterioration happen to nearly every concrete garage floor eventually. When damage appears, it's not just an aesthetic issue. Untreated cracks allow water infiltration, accelerate concrete breakdown, and can compromise the structural integrity of your floor. The good news is that with professional concrete repair and crack treatment in Leesburg, VA, your floor can be restored to a solid, clean foundation before applying protective coatings that will keep it beautiful for years to come.
At Garage Design Source, we understand that your garage is more than just a place to park your car. It's storage space, a workshop, a showcase of your home's overall quality. That's why we treat concrete repair with the same attention to detail and commitment to lasting results that we bring to every garage project. Whether you're dealing with a single troublesome crack or widespread spalling from freeze-thaw cycles common in Northern Virginia winters, our concrete repair and crack treatment services address the root cause and prepare your floor for a complete transformation.
Why Concrete Cracks Develop in Leesburg Garages
Concrete doesn't last forever without maintenance, and Northern Virginia's climate creates specific challenges for garage floors. The freeze-thaw cycles that Leesburg experiences - where moisture seeps into tiny cracks, freezes, expands, and pushes the concrete apart - are a primary cause of accelerated deterioration. This is especially true for older homes or floors that have been exposed to salt from winter road treatments tracked in on vehicle tires.
Cracks also develop from:
- Concrete shrinkage - As concrete cures, it naturally shrinks, and if proper control joints haven't been placed, that stress releases through random cracks
- Heavy loads - Years of vehicle weight, tool storage, and equipment can cause stress cracks, especially in concrete that wasn't reinforced during original installation
- Poor drainage - Water pooling on or under your garage floor creates hydrostatic pressure that weakens concrete from within
- Settlement - If your home's foundation shifts or settles unevenly, the garage floor can crack in response
- Impact damage - Dropped tools, equipment, or accidental impacts can chip, crack, or spall the surface
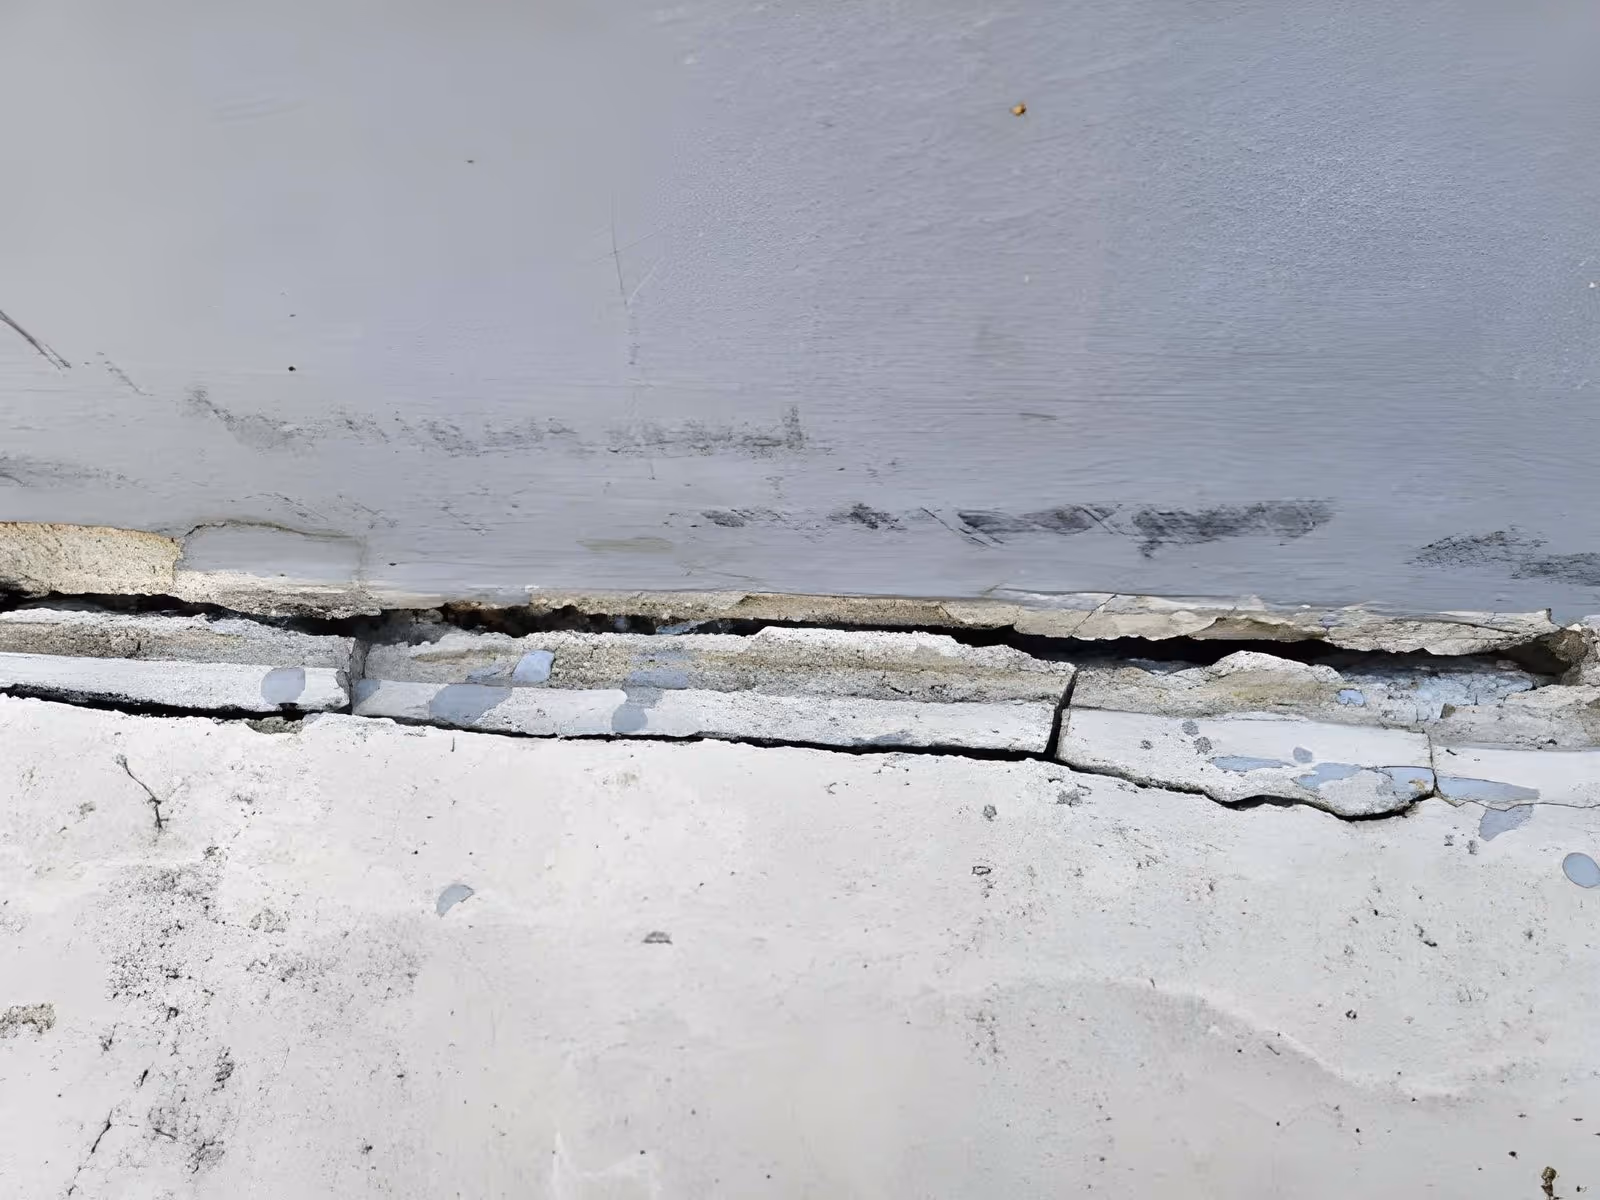
Once a crack appears, ignoring it is a mistake. Water enters through even hairline cracks, finds its way underneath, and begins breaking down the concrete from below. What starts as a small crack can expand significantly within a single season in Leesburg's climate.
Comprehensive Crack Assessment & Inspection
Before we recommend any repair approach, our team at Garage Design Source performs a detailed inspection of your concrete floor. Understanding what type of crack you're dealing with - and why it exists - is essential to choosing the right repair method that actually lasts.
During our inspection, we evaluate:
- Crack width and depth - Hairline cracks (less than 1/16 inch) versus wider cracks (1/8 inch or more) require different treatment approaches
- Crack pattern - Random cracks typically indicate shrinkage or settlement, while cracks that follow a grid pattern often point to inadequate control joints
- Location and direction - Cracks near seams or following structural lines tell us different stories about what's causing the damage
- Moisture presence - We check for water seeping from cracks, which signals that moisture is actively undermining your floor
- Spalling extent - We identify areas where the concrete surface is flaking, chipping, or deteriorating, which require patching before sealing
- Underlying cause - We assess whether the damage is from freeze-thaw cycles, vehicle weight, drainage issues, or foundation movement
This thorough assessment isn't just a preliminary step - it's how we ensure that the repair method we recommend will address your specific situation and provide lasting results. A crack caused by poor drainage needs different treatment than one caused by concrete shrinkage, and we tailor our approach accordingly.
Surface Preparation & Cleaning
Before any repair material can bond properly to your concrete, the floor must be meticulously prepared. This is where many DIY attempts and lesser contractors cut corners - and where durability suffers.
Our surface preparation process includes:
- Pressure washing - We remove all dirt, dust, oil stains, and contaminants that would prevent repair materials from bonding to the concrete
- Grinding or shot blasting - For areas with significant spalling or multiple cracks, we mechanically prepare the surface to create texture that allows epoxy or polyurethane to grip securely
- Crack widening if necessary - For very narrow cracks, we may carefully widen them slightly to ensure that our injection materials can penetrate fully into the crack depth
- Removal of loose concrete - Any flaking, chipping, or deteriorated areas are carefully removed so that only solid concrete remains
- Degreasing - Oil and chemical stains are treated with appropriate degreasers to ensure a clean surface for repairs
- Drying - Concrete must be completely dry before we proceed, as moisture interferes with epoxy and polyurethane bonding
This preparation phase takes time and attention, but it's the foundation of a repair that actually holds. At Garage Design Source, we never rush this step because we know that the quality of your final floor depends on it.
Crack Routing & Injection Methods
Once your floor is properly prepared, we address the cracks themselves using proven injection techniques. The method we recommend depends on the type and severity of your cracks.
Epoxy Injection for Structural Cracks
For cracks that are wider than 1/16 inch or that show signs of active water infiltration, we use epoxy injection. Epoxy is a two-part system that chemically bonds to the concrete and fills the crack from the bottom up, creating a seal that's actually stronger than the original concrete in many cases.
Our epoxy injection process involves:
- Installing injection ports (small tubes) along the length of the crack, spaced 12-18 inches apart
- Injecting low-pressure epoxy that flows deep into the crack, following it downward into the concrete
- Allowing the epoxy to cure fully, which creates a permanent seal
- Removing the injection ports and finishing the surface
Epoxy injection is ideal for structural cracks because the epoxy actually bonds the concrete together, restoring structural continuity. It's also waterproof, making it the best choice for cracks that are actively leaking.
Polyurethane Injection for Flexibility
For cracks that may shift slightly due to seasonal concrete movement or ongoing settlement, we sometimes recommend polyurethane injection. Polyurethane is more flexible than epoxy, which allows it to accommodate minor movement without re-cracking.
Polyurethane also:
- Expands slightly as it cures, helping it fill the entire crack depth
- Bonds well to damp concrete, making it useful in situations where complete drying is difficult
- Creates a waterproof seal
- Remains flexible enough to handle concrete's natural expansion and contraction
Routing & Sealing for Hairline Cracks
For hairline cracks (less than 1/16 inch), we may recommend a different approach. We carefully route (widen) the crack slightly using specialized equipment, creating a V-shaped channel that our repair material can fill completely. After routing, we fill the channel with a high-strength concrete crack filler or thin epoxy, then finish it flush with the surrounding surface.
This routing and sealing method works well for cosmetic concerns and provides a water barrier without the expense of full injection systems.
Patching & Leveling Spalled Areas
Spalling - where the concrete surface flakes, chips, or breaks away - is common in Leesburg garages, especially where water has infiltrated through cracks and frozen beneath the surface. We address spalling in two ways depending on the extent of damage.
For shallow spalling (less than 1/2 inch deep), we use a concrete patching compound. We:
- Remove all loose concrete in the spalled area
- Clean away dust and debris
- Apply a concrete bonding agent
- Fill with self-leveling concrete repair compound
- Finish flush with the surrounding surface
- Allow proper cure time before sealing
For deeper spalling or larger areas, we may recommend that the damaged section be chipped out and replaced with new concrete. This more significant repair is sometimes necessary when spalling is extensive or when it's affecting multiple areas of your floor.
After patching, we focus on leveling. Even minor height differences between patches and original concrete can be problematic - they create trip hazards and make it difficult to move equipment smoothly across your floor. We use grinding and self-leveling compounds to ensure your repaired floor is smooth and level.
Protective Coatings After Repair
Once your concrete is repaired and leveled, the next critical step is protection. Uncoated concrete remains porous, vulnerable to moisture, staining, and ongoing deterioration. This is why we always recommend that repaired concrete be sealed with a protective coating.
At Garage Design Source, we offer several coating options that complement your repaired concrete:
Epoxy Coatings - A two-part system that creates a thick, durable finish. Epoxy provides excellent durability, chemical resistance, and a professional appearance. It's ideal for garage floors that will see regular vehicle traffic and need to handle oil spills or chemical exposure.
Polyaspartic Coatings - A faster-curing alternative to epoxy that provides similar durability with a quicker return to full functionality. Polyaspartic coatings can cure in 24 hours or less, depending on conditions, making them ideal if you need your garage back in action quickly.
Polyurea Coatings - The most durable option we offer, polyurea provides exceptional impact resistance, flexibility, and longevity. If your garage sees heavy use or you want maximum protection, polyurea is the premium choice.
Each of these coating systems will seal your repaired concrete and protect your investment for years to come. The coating process involves:
- A final cleaning and light surface prep of the repaired concrete
- Application of a primer (if required)
- Application of the colored base coat
- Application of a protective topcoat
- Full curing before returning the space to regular use
The combination of professional concrete repair followed by a high-quality protective coating transforms your garage floor from damaged and deteriorating to restored, sealed, and beautiful.
Timeline & Cure Times for Leesburg Projects
The total timeline for your concrete repair and crack treatment project depends on the extent of damage, the repair methods used, and the coating system you choose. Here's what you can generally expect:
Assessment & Preparation - 1 to 2 days, depending on the size of your floor and the extent of surface preparation needed.
Crack Injection - For epoxy or polyurethane injection, the actual injection process typically takes 1 to 2 days. However, epoxy requires a full cure period, which is usually 5 to 7 days before heavy use. In Leesburg's climate, we factor in temperature and humidity conditions that can affect cure times.
Patching & Leveling - If spalling needs to be patched, add 1 to 2 days for the repair work plus cure time. Most concrete repair patches achieve initial cure in 24 to 48 hours, though full strength can take longer.
Coating Application - The coating process itself typically takes 1 day, but cure time varies by system. Epoxy usually requires 5 to 7 days before you can drive on it with a vehicle. Polyaspartic can be ready in 24 to 48 hours. Polyurea, while extremely durable, requires similar cure periods to epoxy.
Total Project Timeline - Most comprehensive concrete repair projects, including inspection, repair, and coating, take 7 to 14 days from start to finish, including cure times. We schedule work to minimize disruption to your daily life and coordinate with your schedule.
Leesburg's weather conditions matter too. We monitor temperature and humidity during concrete work because both affect how materials cure. During winter months or periods of high humidity, cure times may extend slightly, but our experience in Northern Virginia's climate means we plan accordingly.
What Affects the Cost of Concrete Repair
The investment required for concrete repair and crack treatment varies based on several factors specific to your situation:
- Crack length and width - More extensive cracking requires more injection material, ports, and labor time
- Number of spalled areas - Each patching project adds to the total time and material cost
- Repair method chosen - Epoxy injection costs differently than polyurethane or routing and sealing
- Coating system - Adding a protective coating increases the investment but dramatically improves longevity
- Floor condition - Floors that are very dirty or contaminated require more intensive surface preparation
- Your location in Leesburg - We serve the entire Leesburg area, and some locations may require additional travel time
During our inspection, we provide a clear explanation of the work needed and the investment required. We believe in transparency about costs and always explain why specific repair methods are recommended for your particular situation.
Warranties & Long-Term Protection
When Garage Design Source repairs your concrete, we stand behind our work. We provide warranties on:
- Crack repair - We warranty the epoxy or polyurethane injection for a specified period, ensuring that repaired cracks remain sealed and don't reopen
- Patching work - Our concrete patches are warranted to remain bonded and level
- Coating systems - Your protective coating comes with a manufacturer's warranty that covers durability, adhesion, and wear
The specifics of each warranty depend on the repairs performed and the coating system chosen. During your consultation, we'll explain exactly what's covered and for how long.
Beyond the warranty period, the longevity of your repaired floor depends on maintenance. A properly repaired and coated concrete floor, with basic care, can remain in excellent condition for 10 to 15 years or more.
Maintenance Tips for Your Repaired Concrete
To maximize the life of your repaired and coated floor, follow these maintenance recommendations:
- Regular cleaning - Sweep regularly to remove dirt and debris that can scratch coatings. Clean up oil and chemical spills promptly using appropriate cleaners for your coating type
- Avoid harsh chemicals - Don't use acidic cleaners or strong degreasers that can damage your coating. Stick to pH-neutral cleaners designed for coated concrete
- Prevent water pooling - Ensure your garage has proper drainage so water doesn't sit on the floor for extended periods
- Protect from impact - While your coating is durable, avoid dropping heavy tools directly on the floor. Use a mat or work bench when possible
- Address spills immediately - Even with a protective coating, oil and chemical spills should be cleaned up promptly to prevent staining or surface damage
- Inspect for damage - Periodically check your floor for any new cracks or damage. Addressing small issues early prevents them from becoming larger problems
- Re-coat when needed - Most coatings remain protective for many years, but over time they may wear in high-traffic areas. A refreshing coat every 8 to 10 years keeps your floor looking and performing like new
Why Choose Garage Design Source for Concrete Repair in Leesburg
As a locally owned and operated garage specialist, Garage Design Source brings more than 20 years of experience to every concrete repair project. We're not a general contractor who handles concrete repair as one of many services. We specialize in garage systems - flooring, storage, doors, and more - which means we understand your garage's unique needs.
When you choose us for concrete repair and crack treatment:
- You work with specialists - We've repaired hundreds of garage floors in Leesburg and throughout Northern Virginia. We know what works in our climate and what doesn't
- You get thorough assessment - We don't guess about your floor's condition. Our detailed inspection identifies the real cause of damage and the repair method that will actually last
- You receive quality materials - We use epoxy, polyurethane, and coating systems from trusted manufacturers that are proven to perform in Northern Virginia's climate
- Your project is coordinated - If your concrete repair is part of a larger garage transformation - new epoxy flooring, storage systems, or a new garage door - we coordinate all the work seamlessly
- You're supported long-term - We provide clear warranties and maintenance guidance so you understand how to care for your investment
Your garage floor supports everything that happens in your garage. When cracks appear or spalling develops, treating it with the right repair method - not a quick fix - ensures your foundation is solid, sealed, and ready for years of reliable performance. Concrete repair and crack treatment in Leesburg, VA, from Garage Design Source, restores your floor's integrity and prepares it for the protective coating that will keep it beautiful for the long term.